Showing posts with label Mad About Scrappin. Show all posts

CARDSTOCK...THE NEW HERO!

Do you have a mounting selection of cardstock sitting in your stash that gives little inspiration? Has your cardstock only ever been used as your base albeit an important role but not very awe-inspiring?

By simply making it the hero product you can create many cool projects using your overlooked scrapbook stash of cardstock. With a little bit of dressing up, you can take your cardstock out of the mundane and breath new life into it!

Over the next few weeks we will be showcasing some very simple and inspiring ways to utilise cardstock and maybe even get you using some of your tools like punches and your cuttlebug that are collecting dust like mine are.

So I hope you will join us in exploring the use of Cardstock and maybe just maybe re-think and re-invent new uses for this humble of scrapbook products.


Project 1
The Fun Fair:
An explosion of colour, shapes and pattern.

Cardstock comes in a wide range of colours covering the entire colour spectrum. There are bright, parchment and pastels including some metallic also available. You can get it in varying textures like linen, canvas or a woven cloth. They also come with an embossed pattern, which is great to add some extra texture instantaneously.

In this project I am going to show you in 3 easy steps how you can create a fun colourful page, filled with lots of pattern and shape without the use of patterned paper and other embellishments. The key is to select a collection of coloured cardstock that energise and evoke a sense of fun and then you are well on your way to creating a masterpiece entirely made of cardstock.

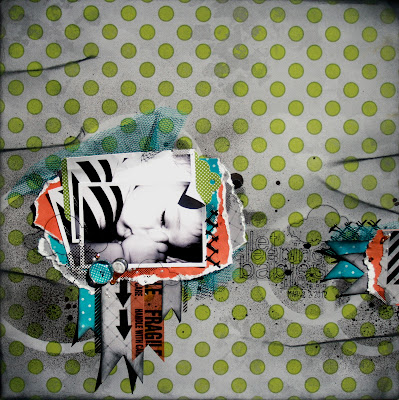
Below is a digital scrapbook page I created as a draft design. I often do this so I can iron out the composition of my designs and then it will become my reference guide to how I create my traditional page. So now that thats done, lets begin…
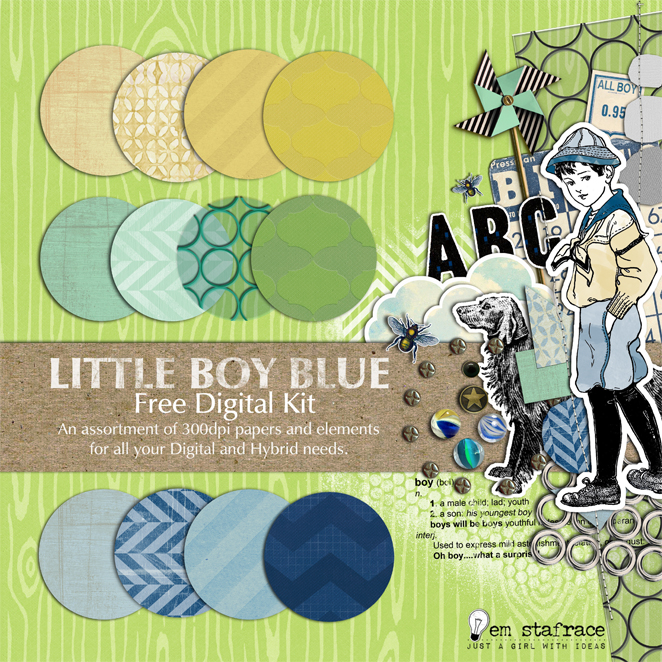
‘Clowning Around’
Digital Credits:
Embossed and Plain Cardstock Papers by Emma Stafrace
Essential Digital Stitches: C Smith Designs
Word Art: Foto WordMix No.1 by Anna Aspnes
Alpha: Blue Illusion by Kaye Winiecki

Step 1:
Using your Cuttlebug and embossing folders to depress a textured pattern on various coloured cardstocks. Making sure you use many different patterned folders to add a variety of raised impressions on your cardstock.

Step 2:
Cut the embossed cardstock into different shapes. I am cutting mine into diamonds which were inspired by the bright and colourful lights at a recent travelling road show my family and I went to.

Step 3:
After adding some inked areas using a Crafters Worshop template I included some customized word art by creating my own using a product called Grafix –Rub Onz. The great thing about this product is you can stamp, paint and draw on it so its versatitlity is fantastic. (To see how to use it check out a tutorial on how to use that here on my blog). Then I positioned the pre- embossed and cut diamond shaped paper discs to the base cardstock.

Step 4:
Once the cardstock diamonds were adhered to the base I ran some straight stitching in vertical rows running through the centre of each grouping this not only fixed them more permanently to the base cardstock it also added another element without being too overwhelming. And finally after printing off the title it was included to finish off the page. 

So there you have it I hope you enjoyed this really fun and easy look at creating with cardstock and perhaps inspired you to use it as your hero material in future projects.

Em Stafrace

Photobucket

LITTLE BOY BLUE KIT FREEBIE!


Hi everyone,

Some of you may know that I have been wanting to create digital kits for a long time, and a couple of years ago I shared a few with friends to see what they thought. The feedback was great but my lack of confidence was what held me back from moving forward.

Anyways since those days I have learnt a lot more about digi designing and of course still have a long way to go, however....I have had a change of heart and am feeling a little more confident in sharing some mini kits that I have been working on. I have a few up my sleeve so watch this space tee hee!

Here is the first of some freebies I will be sharing with you...the kit is called,

'LITTLE BOY BLUE' 
The kit includes:
12 X Patterned Papers
2 X Transparency Papers
15 X Mixed Elements
2 X Paint Spray Masks
1 X Boy Defined Wordart
LBB Alpha Sheet .png format

Click on the links below to download
Click on the link below to download 
Here is a page I did using the kit which also worked perfectly with the latest Casefile #29 at C.S.I 
and one for the Mad About Scrappin' July Sketch Challenge.
and here is the sketch for July.
I hope you likey the kit! Send your friends by so they can download the kit too ;) and please if you do use this kit in any of your digi or hybrid projects I would absolutely love to see them so let me know here by linking your blog post or gallery upload or alternatively by emailing me at justagirlwithideas@hotmail.com  I will be so buzzed to see your fabbo artworks using them and perhaps feature some here at a later date!

Happy Scrapping!
xox

NOW PLAYING...

Its that time of the month again the new sketch challenge is live over at Mad About Scrappin's FB page your project must be uploaded to the FB page by the 25th of June to be in the running for 2 X $10 Mad About Scrappin Vouchers. NB: Your layouts are not to be used for any other competitions.
This months sketch is a 3 photo design but as you can see below I only used two. I also used a fabulous kit called 'Movie Night' by Miss Mint which you can grab at Peppermint Creative to create both the traditional and digital versions of my DT page.


There is also a fun tutorial I did sharing some of my tips on 'How to Create a Hybrid Scrapbook Page' with some easy to follow steps on how to make your very own embellishments using digital kits over at the Mad About Scrappin blog you can check it out here :) Its specifically using the kit I mentioned above and that you can see below 'Movie Night' by Miss Mint, but can easily be applied to any digi kit you might have in your scrappy stash.
The tutorial shows you how to make glass cabachons, add dimension to cut out shapes, making realistic tickets, creating those fun skewered embellishments that are so popular at the moment and addressing the minor aesthetics that add a whole lot of punch to the end product.
I hope you find the tutorial helpful and maybe just maybe get you thinking about how a digi kit can open up your world of scrapping to a completely new territory of customisation and fun.
Have a fabulouso day! xox

A LITTLE MAD ABOUT SCRAPPIN ECHO PARK!

Ya just gotta cheer when the boss lady gives you the coolest papers to play with... This month Leanne gave me Echo Park's This & That Charming range of PP's to play with and I was smiling widely.

I really enjoyed being able to freely add lots of yellow and a touch of aquamarine to satiate my need to use these colours. If you are wanting the kit there is only one left after todays bumper Flog it Friday Sale over at Mad About Scrappin but there are plenty of other goodies and cool kits the DT have put together, so pop over and have a looksie.

For now here are my pages I hope you like them :)


Thanks for stopping by, hope you have a spectacular weekend, I have a bit of art journaling to get finished so better brew a cuppa a delve deep :)
xo

I'M MAD ABOUT SCRAPPIN!

I warned you that there would be a few posts this week, so to stay true to form here is post number 2 tee hee.

This months 'May' Sketch Challenge at 'Mad About Scrappin' is using another Page Draft specifically designed for MAS, here is my page and the sketch below it.
(NB: More confetti created using the EK  Swiss Cheese Punch, see told you I am hooked tee hee.) 


So if your up for a challenge pop on over to Mad about Scrappin on Facebook, create a layout based on this sketch upload to FB by May 25th to be in the running for 2 x $10 vouchers.  Please note layout is not to be used in any other online competitions.

Happy scrapping and good luck!

A LITTLE BIT OF AUTHENTIQUE PAPER CELEBRATION AT MAD ABOUT SCRAPPIN

I was so lucky to be given the 'Celebration' range of pp's by Authentique Paper as my DT kit for this month at Mad About Scrappin, and after creating several pages from this fanatstic paper range it seems the kit was a sell out, very exciting stuff. I have an uncompleted page which I will show you once I finish it but here is what I created using the range so far and will update the post when its done ;).
In this layout titled 'U&I' I thought the 'Enjoyment' pp leant itself to a bit of fussy cutting which I havent done in ages. I also made a mask from Tim Holtz make 'Your own mask' film using the floral design as inspiration. From the Elements Stickers sheet I used some of the pieced words to form the journaling and to echo a stylised version of brick work which was a fun way to combine the journaling and also add an element of interest.
 
This lo titled 'Don't Stop Playing' I decided to go with the 'B side' of 'Rejoice' pp, that was a given since I am a huge fan of woodprint patterns tee hee. Anyhoo I used a Page Draft template which will be released tomorrow :) I did some really basic gessoing to tone down the base paper then collaged some blue tissue paper to add a soft layer of colour then using a stencil I inked some black spots to help ground the teeny tiny photo's. Finally I added some female icons, the word art and journaling using some Grafix Rub-Onz transfer film which you can buy at Scrapboutique.
The base of this page was done by collaging some word strips I printed then gessoed over the top to tone them back. I then layered some torn strips of the 'Happy' pp on the left and cut some circular discs to add some interest. I also used some funky little 'Road' washi tape from the lovely Amanda of D-Lish Scraps.
This one is called 'The Makings of a Perfect Duo'. I loved these piccies of my hubby and son so decided that I would make a boy page using the eye catching 'Laughter' pp as the base. I gessoed some white areas then distress inked in black using the 'Mini Gears' Crafters Workshop template. I had to ink it a couple of times heat setting it between each application. Then I used some fabulous chipboard cogs and gears purchased from ScrapFriends.


Lastly these two cards were created using some of the 'Details' Stickers sheet.

So there you have it, my latest lot of DT pages for MAD, hope you like them. xo

APRIL SKETCH FOR MAD ABOUT SCRAPPIN!

Hi everyone,

The Sketch for this months challenge over at Mad About Scrappin was revealed yesterday. My other site Page Drafts has been commissioned to do the next 6 months worth of sketches and there are some fun ones coming up but this months wont disappoint.

So if your keen for a bit of a challenge all you have to do is create a traditional or digital layout using the sketch below as your inspiration.
Then pop over to Mad About Scrappin' facebook page here and load it into the gallery before midnight Wednesday 25th April to be in the running for a whopping $25 worth of Manor House Creations Flowers.
Here is my dt page and as you can see I quite literally interpreted the sketch as is which is a first for me, I usually try to put my own spin on it, but I guess I can be let off this time since I created the sketch tee hee.

In this one I used some Basic Grey &  Hambly Prints transparent circle paper teamed up with some cardstock.  I also included some customised glass cabachons to add dimension to the circular disc embelishments and printed my journaling on Grafix Rub-Onz to finish it off.
Tip: You don't always have to follow a sketch to the tee, instead of using papers try using a stencil like I have here with the tiger stripe that I created by cutting the pattern out of acetate, it adds more depth and  a varied point of interest.

Happy scrapping everyone, hope you have a crafty week ahead of you and thank you for stopping by xox

MAD ABOUT SCRAPPIN 7 DOTS STUDIO

You may have heard whispers around the traps about my new design team possie, but I haven't shared it officially here in Blogland so today seemed like the perfect moment to do the big reveal! I am now working for the lovely Leanne Lovett at 'Mad About Scrappin' yippee! I love Leanne's fun and vibrant personality she is always a barrel of laughs crazy lady that she is tee hee! And when she advertised her search for a new DT I didn't hesitate. Now I know some of you know that she and I are good buddies, but that didn't mean I got a free walk in, I still had to apply, share a bit about what I hoped to achieve and bring to MAS and what my personal endeavours are in the world of scrapping. 


I was right chuffed to get the acceptance email and almost straight away a parcel of goodies was presented to me to get cracking on. So here a few layouts I created using the 'Elsie Rebel' patterned papers by 7 Dots Studio and an Inspiration pack full of different textured materials that Leanne gave to me and Melanie McKenzie to play with.


This page called 'Meow' showcases the 'Extraordinary' pp. I used some gesso, and then with the Spiced Marmalade distress ink by Tim Holtz inked over the top of a paper doiley which I used as a mask.
Because circles feature strongly in this page I decided to balance that out by adding strips of paper, transparency and washi tape vertically behind the photo's which really helps break up the circular repetition and define the photo's. Then I covered a chipboard arrow in washi tape to help connect the title to the photo cluster. Finally from the inspiration pack I used the bottle cap as a stamp to add some more circles (like it needed more of those lol)


In 'Let Sleeping Babies Lie' I used most of the papers from the Elsie Rebel range but featured the 'Sensitive' pp as the base. I clustered 3 photo's of Tige sleeping and layered them with torn pieces from the other papers. I used some aqua tuile and some more of the gutter guard for extra texture from the inspiration pack. I designed a word-art for the title and printed that off along with some cloud shapes and half tone paint splatters on Grafix Rub-onz which just adds a little extra something to the overall page.
Lastly I customised some glass cabachons by gluing them to some paper off cuts waste not want not!

Oh and I used the new Words or Whatever Circle AltaMATZ that Leanne sells, they are fantastic. 


This page 'Don't be afraid to fall' is using the 'Delightful' PP from the Elsie Rebel range. I incorporated some stickers from this set and used a Heidi Swapp 'Damask' mask by inking it to create more depth in the background. 


From the inspiration pack that Lea gave us I cut a strip from the rubber mat, painted it and adhered it to the page and finally, mounted the photo on a piece of the gutter guard for added  texture.

For the final page 'Funny Faces' I used the 'Over Emotional' and 'Imperfect' papers. You can just make out the misted area using the Gutter guard as a mask in the top left corner I think I used the Chalkboard 'Monolith' misting spray, hence why it is subtle but it has a gorgeous shimmer. The handcut chipboard sun has an imprinted texture from the non slip matting over the surface. Both very subtle but I think the added texture creates a softness to the page.
So there you have my exciting news. If you are interested and learning more check out the Mad About scrappin Facebook page here.
Thanks for stopping by  xox

7 DOTS STUDIO 'DREAMER' PAPERS

OMGoodness, when Leanne from Mad About Scrappin approached me to Guest DT I was excited but when she showed me the gorgeous papers from 7 Dots Studio latest PP release I was doing cartwheels. These papers are absolutely divine. The A sides are an explosion of colour, layers and textures and the B sides are soft, warm and simply divine. So I had an absolute blast with these papers here's a product image of the range. 


So if you like what you see here and are interested in  buying a kit to create similar projects to the ones below scoot on over to Leannes FB Page and snaffle up a kit before they sell out or buy yourself some of the papers! :)
Here is an image of the 7 Dots Studio release,
and below are my layouts using the 'Dreamer' range.
I used black tea to stain the paper and create some lush grungy drips. I also used a paper doiley as a mask to ink  the background. Tip: To add some extra bling why not glue some beads to your page they are as cheap as chips and are an unexpected little addition to any page.
Below is a close up of the beads I used Dimensional magic to adhere them.
Cut your photos into circles is a great way to add some interest to your page rather than the same old same old standard formats. 
 Tip: Layer lots of different masks, tapes, stamps and stitching to create and interesting focal point.
Cut out some random shapes from card stock and lay them directly onto your paper before inking. This is a perfect way to add some points of interest to an already very busy patterned paper.
 Tip: Try using some transparent embellishments to add a little extra something without being too obvious.
Gesso, Gesso, Gesso, this should be a staple in your scrap stash. Its an awesome way to tone down an intricate paper without detracting from it. Its also a perfect preparation for inking and misting on top of.
 Tip: Layer lots of elements and cluster them tightly, this is a rule of thumb when I create a page. Also consider using lots of different textured materials and fibres, particularly things you can find around the house...Save onion and garlic bags they are priceless! 
And finally, combine all those tips into one page, tee hee. Masking, Inking and gessoing are fantastic techniques and tools to include in all your pages.
 Tip: Dont feel like you always have to have lots on your page, less is more in some instances, often just one embellishment and or one wordart speaks volumes.
Hope you likey! xox

TIME TO SHINE

The Color Room palette for this week is a beauty. I am inlove with the colours and decided to create a shabby chic-esque (is that a word)style digital page for this weeks release all about moi!
The digital base paper I created by photographing a piece of cardstock that I had gessoed and then collaged the border with lace, masking tape and cheesecloth in between each layer adding more gesso. Here it is before I played with it on PSE. 
I love how it turned out so will be making more of these for sure maybe to add into kits, what do you think? I would love some feedback on this as some vintage train tickets I made sold in minutes over at Mad About Scrappin on their FB page, you can see one of them in use here both in a digital and traditional format. 
Thank you for stopping by guys and would really appreciate your feedback on the handmade paper :) Have a fantastic weekend xox